AutoCAD Tips & Tricks
Today's Tip
Absolute and Relative Coordinates
| Coordinate | Interpretation |
|---|---|
| 25,75 | depends on context |
| @25,75 | relative |
| #25,75 | absolute |
It used to be very simple. Enter a coordinate and AutoCAD interpreted it as an absolute coordinate. Enter a coordinate preceded by "@" (the at sign) and AutoCAD interpreted it as a relative coordinate. This simple rule changed when dynamic input was introduced and now the interpretation of coordinates is contextual. For example, when you draw a rectangle using RECTANG, the coordinate for the second point is interpreted as absolute with dynamic input turned off and as relative with dynamic input turned on. Really, try it and see.
Fortunately, there's a new coordinate prefix that forces an absolute coordinate, even when AutoCAD decides you want a relative one. Precede any coordinate with "#" (the hash sign) to force an absolute coordinate.
Yesterday's Tip
Quick Extrusions with Presspull
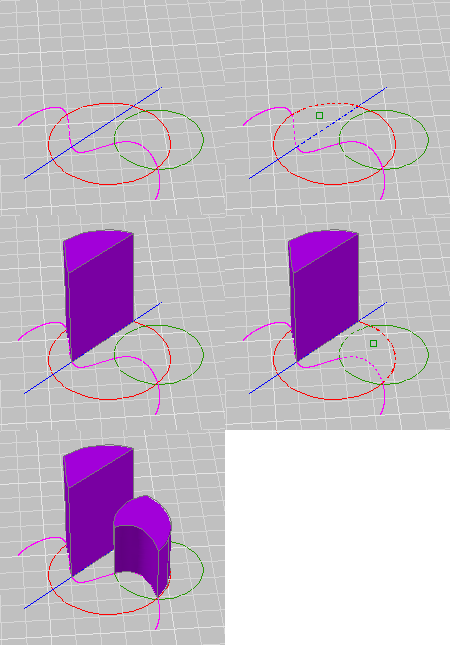
 As of AutoCAD 2007, there's no need to draw closed shapes before extruding. The Presspull tool will find any enclosed area (just like BHATCH) and extrude it.
Any objects can be used as boundaries; lines, circles, splines, they all work. This makes building 3D solid models much quicker than before.
Wednesday's Tip
Object snap tracking
 Finding the centre (centroid) of a square or rectangle used to require the use of at least one construction line but with object snap tracking, the same point can be found without having to draw any other objects.
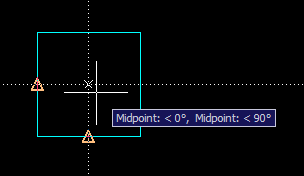
This technique relies on the fact that "Midpoint" is set as one of your running object snaps and that polar tracking (POLAR) and object snap tracking (OTRACK) are on. Say you have a square and you want to draw an inscribed circle. Start the circle command and then hover the cursor over one of the vertical sides of the square until the midpoint snap icon appears. Move towards the centre and a dotted tracking like will appear. Next, hover the cursor over one of the horizontal sides of the square until the midpoint icon appears, again, move towards the centre of the square. This time, when you get close to the centre, both horizontal and vertical tracking lines appear and you can snap to the intersection simply by left-clicking. Finish the circle by snapping to any midpoint.
Tuesday's Tip
AutoCAD 2007 - Where's my old XREF Manager?
 A lot of people using AutoCAD 2007 and above don't like the new XREF Manager, so here's a simple way to get the old one back.
AutoCAD 2007 introduced a new way to manage XREFs and to bring up the "old" XREF Manager, you have to type CLASSICXREF at the command line. Well, if you want things back the way they were and use the classic XREF Manager as the default from the keyboard and from the menu, a few adjustments will get you there…
First, go to . This command opens the ACAD.PGP file in Notepad. This is where all the keyboard shortcuts are defined.
Next, scroll down until you see XR (or use ), change the value from *XREF to *CLASSICXREF and save (). Close Notepad and return to AutoCAD. Enter the command REINIT, check the "PGP File" checkbox and click "OK". That fixes the keyboard so that next time you type XR, you'll see the old manager and not the new one.
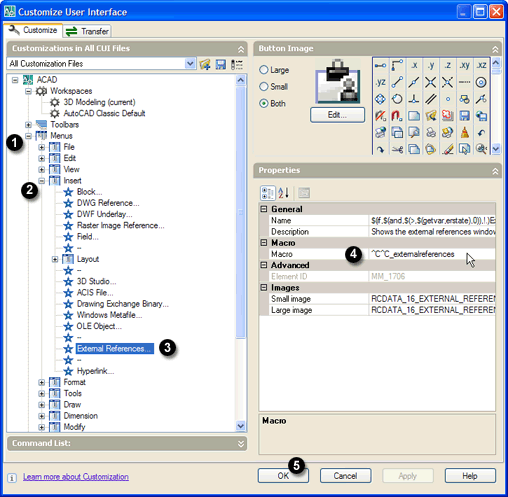
To change your Menu, type CUI at the command line. In the "Customizations in All CUI Files" pane of the "Custom User Interface" dialogue, go to and click on it once to highlight it.
Now, in the "Properties" pane, change the "Macro" setting from ^C^C_externalreferences to ^C^C_classicxref, click "OK" to save the changes and you're done.
Monday's Tip
Shift for fillet radius zero
Do you get fed up having to set your Fillet alternately to a radius value and then to 0 to get a right angle?
You don't have to! Just fillet your lines while holding down SHIFT and the current default fillet radius value will be ignored.
Sunday's Tip
Tab through commands
This tip works begining with AutoCAD 2006:
 At the command line, type the first letter of the command you wish to start. Do not press
 ![]() (ENTER); instead, press the TAB key repeatedly and watch as AutoCAD runs through an alphabetical list of all commands, beginning with the letter you first typed. When the right command appears in the command line, press
(ENTER); instead, press the TAB key repeatedly and watch as AutoCAD runs through an alphabetical list of all commands, beginning with the letter you first typed. When the right command appears in the command line, press ![]() to start it.
to start it.
This isn't a very efficient way to invoke a command but it's a great way of finding commands you never knew existed; try it yourself and you will discover that AutoCAD has a lot of commands…
Also, you can press SHIFT+TAB to walk back through the list.
Saturday's Tip
Keeping the UCS icon in its place
By default, AutoCAD always displays the UCS icon at the drawing origin (0,0) unless the origin is off screen, in which case, the UCS icon sits quietly in the bottom left-hand corner of the drawing area.
If you find the UCS icon distracting when it's floating in the middle of the screen, you can force it to be displayed in the bottom left-hand corner using the ucsicon command.
Enter an option [ON/OFF/All/Noorigin/ORigin/Properties] <ON>:
Use the "Noorigin" option to force the icon into the bottom left corner and the "ORigin" option to set it back to the default.
See the UCS Icon tutorial for more details.
Tutorials of the Moment
The most recently viewed tutorials
Planting Beds
|
Loft Mapping
|
|
Last visited: less than one minute ago |
Last visited: 1 minute ago |
|
Creating a Walkthrough
|
Using Co-ordinates |
|
Last visited: 1 minute ago |
Last visited: 1 minute ago |
Local Navigation
Tutorials
Helping you to learn more of the skills you need, for free.
Featured Tutorial:
AutoCAD 2010: The User Interface - Part 3
CADTutor tutorials are comprehensive lessons, designed to give you a deeper understanding.
Total tutorials: 108
Sponsored Links


