 Michael’s Corner #36
December 2005
A “Triple Play” Year
 Autodesk University 2005 marked my third major presentation of the year, and it was pretty exciting. [Earlier this year I held a session at NeoCon World's Trade Fair in Chicago, then I presented an AutoCAD session and the Keynote address at the National Collegiate CADD Conference .] There were over 150 folks in my AU 'AutoCAD Toolbelt' session from a variety of disciplines.
I met some folks from Montana that did mapping for the phone company, a gentleman that taught AutoCAD to High School students, an assorted architect here and there, along with my friends from Southwest Airlines and Workplace Resource in Southern California. Everyone was very encouraging, laughed at the right time, and hopefully took a few things with them that will make them QBSF (Quicker, Better, Smarter, Faster). It was also great to meet one of the "Challenge" winners as we were making our way out of a lab on 3D, as well a couple readers from Washington D.C. who I met in the line to get hot pretzels.
This month, rather than have four separate sections, I'm just going to put a bunch of unwrapped AutoCAD gifts in the Christmas bag for all to enjoy along with some stocking stuffers. Wishing you all a blessed and safe Christmas season.
If you would like to contact me directly, you can do that also.
Blessings to one and all,
Michael
The 2005 AutoCAD Christmas Collection
Dimension Text Box & Background [A2005 + A2006]
On the Text tab in the Dimension Style dialog box, you can set the Fill Color to be the same as the background, or choose a color.
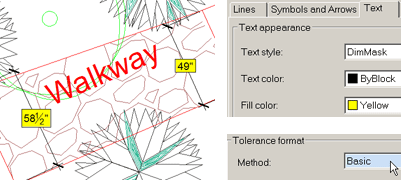
And the box? On the Tolerances tab, set the Method to Basic!
Text Editing in A2006… the Way It Used To Be [A2006]
I'm sure their intent was honorable, but sometimes editing Dtext and Mtext objects in A2006 is… a bit of a challenge. Here's how to put it back the way it was in the earlier releases. Both of these variables are system settings.
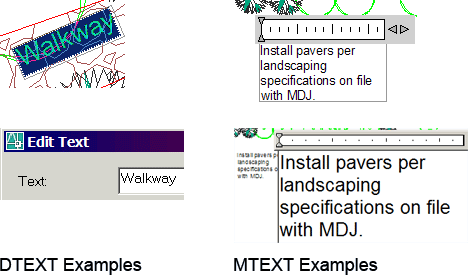
DTEXTED
By default, when you double-click on Dtext in A2006, you get the frameless editor (Dtext figure on the left). If you would prefer to use the Edit Text dialog box to edit your Dtext (Dtext figure on the right), set the variable DTEXTED to 1.
MTEXTED
When you double-click an Mtext object in A2006, the frameless editor comes up (Mtext figure on the left), similar to what you had in A2005. However, in A2006 you can use your wheel mouse to zoom and pan to adjust the size and display of text and the editor. Back in A2005, if you were zoomed out and double-clicked on Mtext, AutoCAD would automatically adjust the size of the editor so you could see the text (Mtext figure on the right). To set the A2006 editor to behave as it did back in A2005, set the variable MTEXTED from <INTERNAL> to OLDEDITOR.
Workspaces [A2006]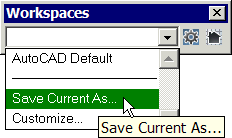
Putting Humpty Dumpty back up on the wall after your Toolbars and Palettes have fallen all over the place.
Instructions to Create a Workspace from the Toolbar
Similar in procedure to creating a Profile, the quickest way to make a Workspace is to set up your work environment, then Save As.
- Position your toolbars and palettes (including DesignCenter and Properties) as desired.
- From the Workspaces toolbar, open the dropdown list and click Save Current As. Enter a name for the Workspace, then click Save.

To set a Default Workspace (My Workspace)
- On the Workspaces toolbar, click Workspace Settings to open the dialog box.
- In the My Workspace = dropdown list at the top, select a default workspace, then click OK.

- Now, after making various changes during the course of your AutoCAD day, when you click the My Workspace button on the Workspaces toolbar, your designated configuration will be restored.
To Save Changes to a Workspace
Dilemma: What if you rearrange your workspace and you want to save that new arrangement by the same name?
 First: Make the necessary changes to your workspace such as the display and position of toolbars.
Next: In the Workspaces dropdown list, click Save Current As.
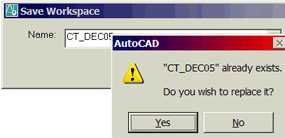
Then: From the dropdown list in the Save Workspace dialog box, choose the current workspace name and click Save.
Now: When prompted to replace, click Yes. Job done!
The CUI [A2006]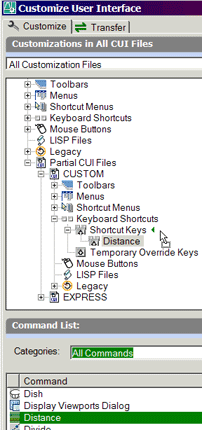
One of the most important things I learned at Autodesk University has to do with the new A2006 CUI. When you want to make new toolbars or changes to existing interface elements, it's best to make those edits under the Partial CUI Files section, as shown. Both Randy Brunette and Robert Bell had superb sessions on the CUI.
If you want to learn more about customization in AutoCAD 2006, watch my website, www.autocadtrainerguy.com, for the link to the posted AU papers which should be up around mid-December, 2005. Here's one we covered in my class that everyone decided would be a good idea…
Instructions to Assign the 'Distance' Command to F1 [A2006]
- Open the CUI dialog box by typing CUI at the command line, or right-click on any button, then click Customize.
- In the Customizations pane, expand Partial CUI Files , then expand Custom . Now expand the Keyboard Shortcuts node.
- Under Command List, drag the Distance command up into the Customizations pane and release it next to Shortcut Keys to add it to the listing.
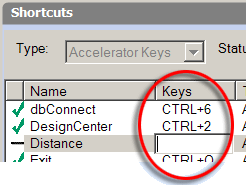
Note: If the recently added command does not initially appear in the Shortcuts pane, you may have to OK out of the CUI, then re-open it.
- In the Shortcuts pane next to the Distance command, click in the Keys column to display an edit box, then press F1 and press <Enter>. You should now see a green checkmark in the column preceding the Distance command name.
- Click OK to close out of the CUI, then hit F1… to launch the Distance command rather than the Help window!!

Stocking Stuffers
![]() Manage the listing of plot scales from [A2006]. Now you control what scales are seen in this list. Rearrange the order of the listing, delete the ones you don't use, or add your own!
Manage the listing of plot scales from [A2006]. Now you control what scales are seen in this list. Rearrange the order of the listing, delete the ones you don't use, or add your own!
This is a great application for the A/E/C and A&D communities who plot in inches-feet. Now they can move the more commonly used plot scales previously relegated to the basement, up to the top!
![]() Adjust the zoom magnification and reduction feature of your wheel mouse. On most wheel mice, when you roll the wheel to zoom in or zoom out, there's a "notch" or "step" the wheel clicks into as you roll it. To adjust how far the drawings is magnified/reduced, at the command line, enter ZOOMFACTOR. The default is <60>. The bigger the number, the bigger the 'jump' on the screen. Check it out.
Adjust the zoom magnification and reduction feature of your wheel mouse. On most wheel mice, when you roll the wheel to zoom in or zoom out, there's a "notch" or "step" the wheel clicks into as you roll it. To adjust how far the drawings is magnified/reduced, at the command line, enter ZOOMFACTOR. The default is <60>. The bigger the number, the bigger the 'jump' on the screen. Check it out.
![]() Template files are now displayed in DesignCenter. Beginning in AutoCAD 2006, template files (DWT) are now displayed in the Folder List of DesignCenter.
Template files are now displayed in DesignCenter. Beginning in AutoCAD 2006, template files (DWT) are now displayed in the Folder List of DesignCenter.
As many of my customers recall, after making a template (great for beginning new drawings), it was wise to make a DWG file containing the same named objects. This enables you to drag the needed text style, dimension style, etc. from the master DWG into a drawing you just received from an outside source. With A2006, the DWT serves as a 'one stop shop' from which your master drawing information can be accessed!
Left Field
Wisemen Honor Him Jesus was about two years old when wisemen visited Him with gold, frankincense and myrrh. King Herod sought to kill all Bethlehem's male children two years old and younger when the wisemen did not return. (Matt. 2:16)
Note from the editor
It's hard to believe that this is Michael's 36th "Corner" for CADTutor - yes, he's been contributing top class content for 3 whole years now. On behalf of you all, I'd like to thank him for such consistently excellent work. Thank you Michael!
I hope to bring you even more excellent content and some exciting new developments at CADTutor in 2006 - keep tuned.
Season's greetings to you all…
David
Donate to CADTutor
If you found this article useful, you might like to consider making a donation. All content on this site is provided free of charge and we hope to keep it that way. However, running a site like CADTutor does cost money and you can help to improve the service and to guarantee its future by donating a small amount. We guess that you probably wouldn't miss $5.00 but it would make all the difference to us.
Note from Michael: I want to thank all of my customers for continuing to retain my training services (some for over three decades!) and let you know your donations do not go to me personally, but to the ongoing maintenance of the CADTutor ship as a whole and to support the yeoman efforts of my friend and CADTutor captain, David Watson, to whom I am grateful for this monthly opportunity to share a few AutoCAD insights.
The Basics
- Dual Dimensions in a Dim…
- UCSICON Options
- "Best of" Basics: Irreg…
- Tool Palette Basics
- Original Dimension Value
- Possible Solutions to th…
- Avoid Using 'Standard' i…
- Shorten the Plot Scales…
- Update the Source File B…
- User Increment Angles fo…
- Drawing Information
- 'Sign Language'
- Rotate with the Copy Opt…
- Use the INSERT Osnap on…
- To or From the Current L…


