 Michael’s Corner #134
June/July 2014
Summer Simplicity
It seems like summer just kind of crept up on us and I can't believe we're nearly halfway through the year already! I'm still investigating AutoCAD 2015 and will present additional content in the months ahead, but this month I simply wanted to show you a few things I encountered in my training sessions recently.
…A very simple but effective method of creating a Solid with the Sweep command
…The new feature in A2015 that conforms to the simple motion of dragging to select objects
…Variables that will make life much simpler if you are aware of what they can do
…An object snap that makes snapping to the insertion point of a block quite simple
Needless to say, the point of summer is to hopefully find time to enjoy the simple things… in AutoCAD.
Safe travels!
If you would like to contact me directly, you can do that also.
Blessings to one and all,
Michael
Sweeping a 3D Shape around a Pline
One of my new customers builds custom kitchens, so here's something I'll be showing them that harkens back to my early days of 3D; the Sweep command. I'm also incorporating similar content for rotating objects in 3D that I covered a couple years ago in Michael's Corner, July 2012.

How to Use Sweep to Create a 3D Solid
 Create the shape shown in the first figure. Add any fillets or chamfers on the corners to embellish the shape.
Draw a rectangle that's at least 10″ wide and 12″ high. This will be the path around which we will sweep the shape.
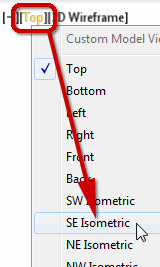
Using the Viewport controls in the top left corner, set the view to SE Isometric.
Using the Viewport controls in the top left corner, set the Visual Style to Shades of Gray.
Click on the object to rotate, and the Move gizmo will be displayed with the arrows for the 3 axes.
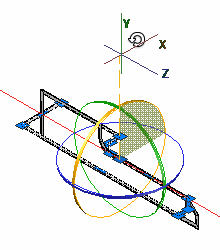 For the Rotation gizmo, right-click on one of the axes, then click Rotate to display the Rotate gizmo (three "hoolahoops" around the geometric centroid of the selected object).
Click on the circle that addresses your rotation requirements—the red one for this exercise. It turns yellow and you see a red line defining the axis of rotation.
Turn on Ortho or Polar if needed, then rotate your object to its final position. As you rotate the object, the arc of rotation is shaded if you're able to see it. It's yellow in this final illustration.
Use the Move command and place the lower left corner of the shape in the middle of the left line of the rectangle.
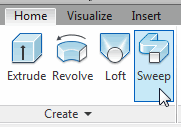 Change to the 3D Basics workspace, then click Sweep on the .
Select the shape as the object to sweep, then press [Enter].
Select the rectangle as the sweep path.
Now set the Visual Style to Sketchy, just for fun.
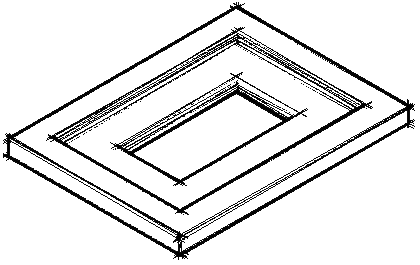
Enjoy!
Power Tool
AutoCAD 2015 ‘Lasso’
 Wouldn't you love to be in those conference rooms at Autodesk when they named features and commands?!
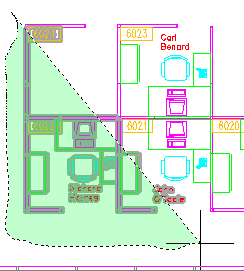
By default, when creating a window around the objects to be selected, you don't typically drag your cursor, you pick-pick two corners. In AutoCAD 2015, however, you can now pick-drag to create a ‘lasso’ around the objects. You can do this prior to selecting a command, or at the Select Objects prompt. Draging to the right creates a window lasso and dragging to the left creates a crossing lasso.
Also, notice in the figures that the objects which will be selected are highlighted before committing to the second corner! This preview features was introduced in A2014.
A2015 Lasso Options
To toggle between the Crossing, Window, and Fence lasso, press the Spacebar.
Note: In addition to the lasso, see Michael's Corner from August 2003 on other selection options so you can select the right stuff!
The Odd Spot
“Buriables” (Buried Variables)
Even though the Command line now ‘volunteers’ your next typed command—something that can be adjusted with the AUTOCOMPLETE command—there are still an amazing assortment of ‘under a rock’ variables.
DBLCLKEDIT
At least every other month I get a question about why someone's double-click doesn't work, such as when you double-click on a Text object to edit it. The solution is to set the variable PICKFIRST to <1>. This is something that I teach in all of my training sessions. The deeper secret, however, is the variable DBLCLKEDIT. That one must be set to <1>, also.
LINESMOOTHING [A2015 only]
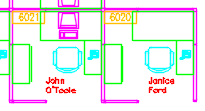
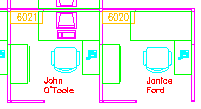
The darker theme of the Ribbon can be resolved by going to Options, Display tab, and set the Color Scheme to Light. But the blurry lines were quite bothersome. Although it doesn't solve all the blurry elements, turn LINESMOOTHING to OFF. Before and After conditions are shown here. With the setting Off, it just seems like the lines are a bit more crisp.
The Basics
Use the INSERT Osnap on Blocks
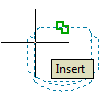
 In Michael's Corner February 2013 I covered the use of the Insert object snap for text. It also happens to be the Osnap you can use for Blocks.
When you need to snap to the insertion point of a block, I don't bother to set it as an Osnap since it's such a seldom-used feature. When the time comes, simply Shift + Right-click to display the Osnap shortcut menu, then click Insert or use the ‘INS’ keyboard shortcut.
Lost & Found
Where's the Layout tab gone?
One of the fun things about installing a new version of AutoCAD is finding out where all the new stuff is and the second fun thing is trying to work out where all the other stuff went! We all know about context sensitive tabs from Microsoft Office (e.g. when selecting an image in Word) but the concept has also been in AutoCAD for a little while, notably with the text editor and block editor functions. In AutoCAD 2015, context sensitivity has been added to one of our core tabs—the Layout tab.

In AutoCAD 2014, the Layout tab is just an ordinary tab, like the others on the Ribbon. Notice though, that most of the options are greyed out—that's because we're in model space and most of the options on that tab are only applicable in paper space.


Notice that the layout tab (when it's visible) is at the right-hand end of the tabs and not in its original location. It also has a blue highlight to indicate that it's context sensitive.
Left Field
Hummingbirds, a garden delight: Hovering over flowers at 3,000 wing-beats per minute takes a lot of energy, even when you weigh less than an ounce—which is why, despite the aggressive eating, these teensy fliers maintain a steady mass. "A hummingbird's diet is mostly sugar-loaded nectar, which its body quickly converts to energy", says Ross Hawkins, founder and executive director of the Sedona, Arizona-based Hummingbird Society. The mini creatures consume an average of 6 calories daily; to put it in perspective, if a 170-pound man had the same metabolism, he'd need to chow down on 2,900 Oreos a day to stay the same size. How's that for eating like a bird? Article courtesy—again—of a recent issue of the Southwest Airlines Spirit magazine. www.spiritmag.com
Donate to CADTutor
If you found this article useful, you might like to consider making a donation. All content on this site is provided free of charge and we hope to keep it that way. However, running a site like CADTutor does cost money and you can help to improve the service and to guarantee its future by donating a small amount. We guess that you probably wouldn't miss $5.00 but it would make all the difference to us.
Note from Michael: I want to thank all of my customers for continuing to retain my training services (some for over three decades!) and let you know your donations do not go to me personally, but to the ongoing maintenance of the CADTutor ship as a whole and to support the yeoman efforts of my friend and CADTutor captain, David Watson, to whom I am grateful for this monthly opportunity to share a few AutoCAD insights.
The Basics
- Dual Dimensions in a Dim…
- UCSICON Options
- "Best of" Basics: Irreg…
- Tool Palette Basics
- Original Dimension Value
- Possible Solutions to th…
- Avoid Using 'Standard' i…
- Shorten the Plot Scales…
- Update the Source File B…
- User Increment Angles fo…
- Drawing Information
- 'Sign Language'
- Rotate with the Copy Opt…
- Use the INSERT Osnap on…
- To or From the Current L…


